( ESNUG 552 Item 2 ) -------------------------------------------- [10/08/15]

Subject: Oski on how to do signoff with bounded (incomplete) formal proofs

>    Paper: Signoff with Bounded Formal Verification Proofs
>
>   Authors: Vigyan Singhal of Oski Techologies
>            NamDo Kim of Samsung Electronics
>
> What does an inconclusive formal proof mean to an engineer?  Vigyan Singhal
> acknowledged "almost all proofs result in bounded (incomplete) proofs",
> but that does not mean they are not useful.
>
> This paper presented a systematic way to understand bounded proofs.  With
> a little bit of analysis, a user can get more confidence in the coverage
> provided by formal tools.  This idea is getting wider traction in the SW
> industry (we have a similar concept) and shows promise to extract value
> from a previously-thought-unpromising aspect of formal tools.
>
>     - from http://www.deepchip.com/items/0547-06.html


From: [ Vigyan Singhal of Oski Tech ]

Hi, John.

I noticed Bernard Murphy of Atrenta called out our paper on "inconclusive
formal proofs" from DVcon'14.

I'd like to offer a follow up that elaborates on this methodology.

Bernard correctly summarized the paper in that we believe inconclusive
formal proofs are useful.  In fact, an engineer can get more confidence
from bounded results because formal guarantees that there is no failure
of fewer cycles than the reported bound in the Design Under Test (DUT).
You can actually calculate the Required Proof Depth for the DUT, and
work your formal testbenches to achieve the Required Proof Depth so as
to achieve formal sign-off.

Recently I took a 12 mile hike at the Rancho San Antonio Open Space
Preserve in Los Altos, CA.
It occurred to me that the process of deriving the Required Proof Depth is
much like estimating the time it takes to take a long hike. Let me explain
the analogy and how it relates to the 6 distinct steps we take to calculate
my Required Proof Depth.
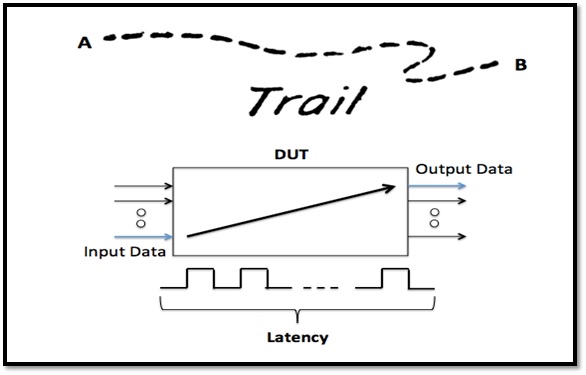
1. LATENCY ANALYSIS
When planning on taking a long hike, a key step is to estimate the amount
of time needed to cover the planned mileage of the trail. For example, a
12-mile hike at typical 3 mph speed will take about 4 hours. This is the
least amount of time needed without stopping.
Similarly, to estimate your Required Proof Depth, we calculate how many
cycles it takes for input data to arrive at output of the design (latency).
We usually perform latency analysis by writing cover properties on output
data valid ports. The resulted latency provides a lower bound for the
Required Proof Depth. Let's assume the number we obtained based on latency
analysis is 13 cycles (N1).
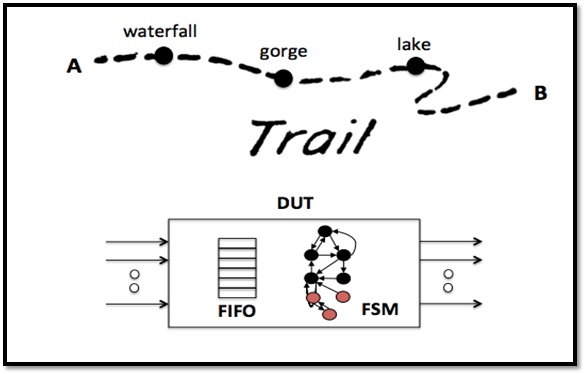
2. MICRO-ARCHITECTURE ANALYSIS
Often we go on a hike to enjoy nature, so it is nice to budget time to stop
at various viewpoints during the hike. Careful planning often involves
understanding beforehand what scenic spots there might be along the way and
estimating how much time to spend at these spots.
Similarly, micro-architecture analysis is like using a magnifying glass to
examine the DUT to identify major design structures, such as:
- state machines,
- counters,
- FIFOs,
- RAM,
- and linked lists.
We usually do this analysis by examining the RTL itself plus writing "cover
properties" to see how many cycles it takes to exercise these structures.
This is another reference point for our Required Proof Depth calculation.
Let's assume the number we got here (N2) is 21 cycles.
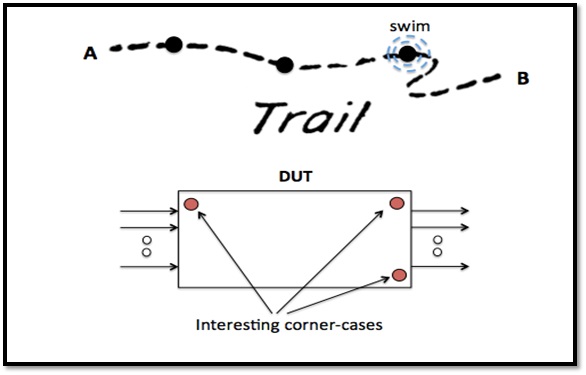
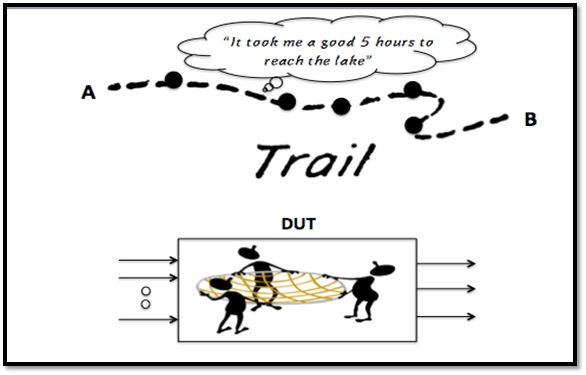
3. COVERS FOR INTERESTING CORNER CASES
Besides stopping at viewpoints, there are usually interesting activities
along the way that we might want to do, such as taking a dip in the cool
lake. Whatever activities there might be, it takes additional time. Your
budgeted hike time should have these interesting activities factored in.
Similarly, there are interesting scenarios in the design we must exercise
to reach different corner cases. This is like coding functional cover
points for simulation to show your design's bugs. (Again, writing cover
properties to give you the number of cycles it takes to reach these
interesting scenarios.) This step ensures all interested corner cases are
covered when formal analysis is performed up to the Required Proof Depth.
Let's assume the largest cycle number required to cover all interesting
scenarios is 18 cycles (N3).
Note: because formal is exhaustive and provides the shortest trace to a
violation, the number of cycles it takes for formal to reach a corner case
bug is much shorter than potentially finding the same bug in simulation.
(So don't be surprised that N1, N2, N3 are around 10 to 20 cycles.)
---- ---- ---- ---- ---- ---- ----
Those first three steps are investigative processes you do before formal
verification so you can calculate the target Required Proof Depth you must
reach. Our target proof depth (Nt) is the maximum of N1, N2 and N3.
Nt == Nmax == max (N1, N2, N3) == max (13, 21, 18) == 21 cycles
These next 3 steps are confirmation processes done in formal verification
to validate that our set target (Nt) really is 21 cycles. It is possible
that through these following steps, our 21 cycles is confirmed to be the
Required Proof Depth. It is also possible that one of the steps below
invalidates this target, so that a higher cycle depth needs to be reached.
Using the hiking analogy, the next three steps are done during the hike
itself to determine the exact time needed for the hike itself.
---- ---- ---- ---- ---- ---- ----
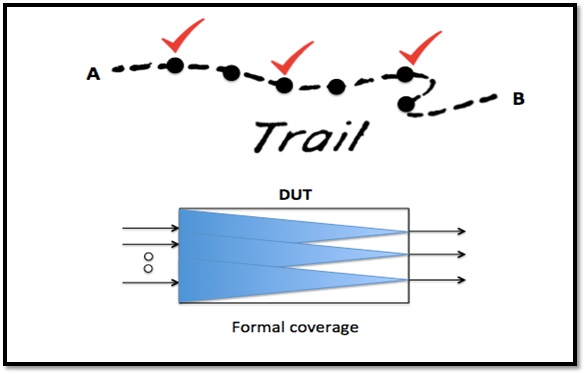
4. FORMAL COVERAGE
Armed with the plan, our hiker on the trail may soon realize that his hike
is much easier than he thought -- so he can got to all the stops he planned,
and might even finish in much shorter time. Or, he may find it tougher
than expected. And he has to rethink his hike. Depending on which reality,
he may have to adjust his time budget for the hike.
Similarly, formal coverage gauges how complete formal verification is when
you're reaching the Required Proof Depth. If your formal tool reports 100%
code coverage when analyzing to 21 cycles, we know we have covered all the
of design -- which serves as one indicator validating our Required Proof
Depth. Any percentage reported less than 100% means we need to increase
our target (Nt) -- until we reach 100% coverage.
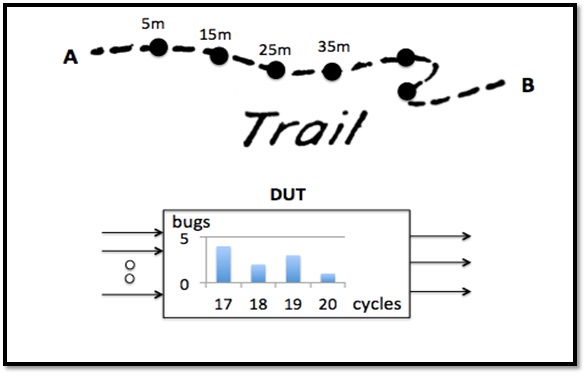
5. FAILURES SEEN DURING FORMAL RUNS
Our hiker planned to stop for only 20 minutes at each viewpoint, but the
reality is he spent 15 minutes, 25 minutes and 35 minutes at the last three
viewpoints. Given that trend, he needs to re-budget and anticipate longer
time for the rest of the stops. On the other hand, if he stopped less than
20 minutes at all viewpoints so far, chances are good that he will do the
same for the whole hike, so his original time estimate is good.
Formal tools always report the "shortest-trace counter examples" in case of
a design failure.  This means all bugs of N cycles will be reported before
any bugs of N+1 cycles will be reported.  Therefore, if all bugs found so
far happened in less than 21 cycles -- and when you go beyong and find no
new bugs -- then it further helps legitimize that 21 cycles is enough.


6. SAFETY NETS

No matter what we budget for, whether it be for money or travel time, it is
always good to put in a safety net to account for unusual situations.  To
have a reasonable safety net, our hiker may look online to see how long it
took other hikers to cover the trail.  Or he may check recent trail
conditions.  Or he may ask fellow hikers on the return path how long it
takes to reach the next milestone.
Similarly, safety nets involve using other means, such as bugs found in
simulation.  Or bugs from a hybrid formal search.  Or bugs found using
different proof engines -- all to confirm our Required Proof Depth that we
calculated earlier.

If there are bugs found by simulation (when both simulation and formal are
run on the same block), users should make sure there are formal checkers
that can find the same bug.  Hybrid formal search starts formal analysis
from deep states inside the design to catch bugs that might be harder to
reach starting from reset states.  Formal tools usually have multiple
proof engines with different characteristics, and some engines are good
at finding bugs, though they may not be good at achieving full proof.
Using these engines may result in finding more bugs.

           ----    ----    ----    ----    ----    ----   ----

For any bugs found by whatever means, if they are found in fewer cycles
than your Required Proof Depth, it means your Required Proof Depth is
probably correct for your design.  In most situations, the maxium of
N1, N2, and N3 turns out to be your Required Proof Depth; and the later
three stages typically just confirm that number.

NOTE: Your particular Required Proof Depth will be very design dependent
and it varies from design to design.  Often it's not a big number, usually
within 10 to 50 cycles -- though we have seen a recenr customer design with
a Required Proof Depth of 200 cycles.  In reality, if your Required Proof
Depth is too large, then it is time to use complexity-solving techniques
such as writing Abstraction Models to reduce the Required Proof Depth for
your design so you can reach formal convergence.

           ----    ----    ----    ----    ----    ----   ----

As you can see, the process of determining your Required Proof Depth is not
rocket science -- but instead a simple set of systematic refinement steps
until you reach your Required Proof Depth that passes all confirmations.

The big takeaway here is once you find (and confirm) your Required Proof
Depth, you're free!  You can do your verification signoff free of the
unrealistic burden of needing to do a time-consuming complete proof!
Going back to our hiking scenario, with a well thought-out plan that uses
refinements along the way, our hiker can reach his destination in good time
while enjoying all the amazing views along the way.

    - Vigyan Singhal
      Oski Technology                            Mountain View, CA

P.S. On Oct 21st, we'll be talking about ensuring enough formal testbench
     completeness for sign-off at our upcoming quarterly Decoding Formal
     Club event at the Computer History Museum in Mountain View, CA.
     It's free and all DeepChip readers are welcome to attend.

           ----    ----    ----    ----    ----    ----   ----

Related Articles

    How I unwittingly started BRCM's Formal Verification Users Group
    Formal users share 8 upsides, 6 downsides, and 13 best practices
Join
Index
Next->Item
|
|